by Belgium potter Wally Asselberghs .

|
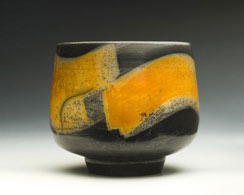
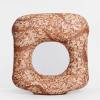
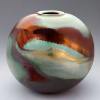
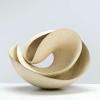
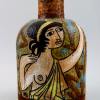
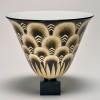
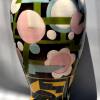
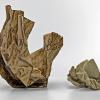
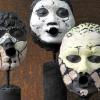
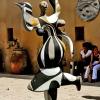
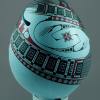
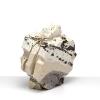
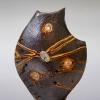
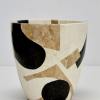
A finished naked raku fired piece by Wally Asselbergh, showing the variety of grays and blacks he achieves through the use of both diluted and thick glaze and varied application methods over the base resist slip.
Slip-resist raku (also referred to as “peel-away slip” and “naked raku”) is a raku technique in which a slip, which is is formulated to not permanently stick to the surface, is applied to a bisque fired piece before the raku firing. During the firing, the slip shrinks and cracks and breaks away from the piece allowing interesting and irregular smoking patterns to develop from the post firing reduction. In today’s post, an excerpt from the May/June 2011 issue of Pottery Making Illustrated, Wally Asselberghs explains his techniques for using slip resist to decorate his pottery. He also shares the slip and glaze recipes he uses in this process. Remember, as with any firing process, especially those that involve an open flame, you should wear protective clothing and exercise all fire-safety precautions. -Jennifer Harnetty, editor. |
|
I fell in love with naked raku in 1995 while attending a workshop on primitive firing techniques by Dutch potter Margot Spiegel Kramer. This was a crucial moment in my life with clay, which at that point seemed to be blocked in a dead-end street. It soon became obvious that this new discovery evolved into a turning point for my ceramic work. New forms started to interact with previously unknown methods of treating my surfaces, painting the canvasses of my forms with fire and smoke. The balance between maximum possible control of the firing process and the surrender to the fire, and the combination of the expected and unexpected originally attracted me to naked raku. Now, many years later, discoveries and variations keep opening up, allowing me to explore new paths that were previously hidden. Artistic Perspective In my organic objects, I try to find a visual language in which my favorite forms (animal, human body, rocks) are reduced to their simplest essence and purity, exhibiting marks as if left by forces of wind and water. On another but equal level, the surfaces of these forms are treated like a canvas. The viewer’s eye meanders between white spaces and black marks left by the fire and reduction techniques of the naked raku process. Technique For my clay body, I use commercial cone 10 stoneware clays for black-and-white objects, and low-temperature red earthenware clays for black-and-orange pieces. Both the stoneware and earthenware contain at least 15 to 20 percent fine grog. Most of my objects are constructed with coils. To obtain smooth surfaces, I’ve always preferred burnishing, as this method gives me the kind of satin matt subtle shine and depth-of-view that I’m looking for. My burnishing tools include credit cards, light bulbs of various sizes and forms, and flat burnishing stones for the final finish. The Slip Layer I use a sacrificial layer of slip as a separation between the bisque and the glaze. After the firing, this layer can be peeled away, revealing the pattern on the surface of the pot. The sacrificial slip can be brushed, sprayed, dipped, or poured. Each method has its pros and cons. Differences in application all influence the thickness of the separation layer.
 Pouring has always been my personal favorite application method because it gives me the best possible control over the correct thickness, and the application also goes very fast. If the form allows a good grip, this pouring can be done in one single movement, turning the object from extreme left to extreme right with one hand, while pouring the slip with the other hand (figure 1).
|
The Glaze LayerFor the glaze, my best results have always been obtained with the “classic recipe” formulated by Will and Kate Jacobson

The application of a full glaze layer over the slip (figure 2) results in a uniform crackle patterned surface. While this can be perfect for some forms, others may need more. A wide spectrum of other methods for partial glazing can be applied, resulting in a more varied surface. The methods you develop will depend on the results you want. Pouring, masking tape patterns, wax resist, latex, etc., all allow full control over the design.
In addition to using brushes for painting glaze on top of the slip layer, they can also be used to actually splash, flick or spatter the glaze onto the pot from a distance, without the hairs of the brush touching the surface (figure 3). This has grown into one of my preferred techniques. Best results are obtained with a very thick glaze. Large brushes create large areas, while very thin brushes can create fine lines. The amount of glaze on the brush strongly influences the result, as well as the force of the wrist when brushes are shaken to release their load of glaze.

While experimenting, splashing on thinner glaze on slipped test-tiles, I discovered that I was obtaining grayish surfaces. I then started fine-tuning and developing this process by making multiple batches of glaze with increasing amounts of water added to the basic mixture. Different bottles, each containing 100 grams of dry materials, were filled with water quantities of 200g, 250g, 300g, and so on, up to 450g. When applied and fired, these diluted glazes created a very interesting and diverse palette of light and dark grays in between the whites and blacks.
Note: A very specific feature of naked raku pots are little “black dots” on the fired surface. They usually enhance the total picture, but an overload can be too much. The dots are caused by air bubbles, either in the slip or the glaze. Larger air bubbles can be paddled to the side in the slip or glaze container, but smaller ones may remain unnoticed. When using a drill or a paint mixer to prepare or mix up the buckets, microscopic air bubbles are created. In this case the mixture should be allowed to settle for 24 hours then remixed with a wooden stick before use.
Dust also contributes to the appearance of dots by keeping the slip from properly adhering to the surface of the pot. If you’re trying to minimize the dots, clean the bisque ware with forced air and then with a damp sponge prior to applying the slip.
Kilns
During numerous workshops, I’ve been able to experiment with a wide variety of raku kilns, ranging from huge furnaces to small garbage-can kilns. One of my all-time favorite kiln types is a refurbished old electric kiln. Removing the elements and electric wirings, and cutting a burner hole and a flue exit is all it takes to make a very cheap and dependable kiln.

At home I also have a top-loader kiln based on an empty 200 liter drum, lined with 2 layers of 2-inch thick low-temp ceramic fiber. Before buying a Ward burner, I have fired this kiln for years with a simple and cheap weed burner, the type also used by roof workers, which also gave excellent, if noisy, results.
Firing
As with standard raku, preheating is also very important for firing naked raku. Though moist objects can be preheated slowly in the first kiln load with a minimal risk of breakage, any consecutive firing schedule makes preheating absolutely necessary. Even if dried in the sun, some moisture will always remain in the bisque ware, quickly changing into steam when placed in a red-hot kiln, causing explosions.

During workshops, when the size of objects is usually quite small, I use 2 different methods, depending on the material available, and expected weather conditions. The easiest way to preheat is to use a large electric kiln, positioned to maintain a constant temperature of 100°C (210°F) and preheat the bisqued objects for 20 minutes. If no electric kiln is available on site, I use one or more large barbecue grills, aiming for a 20 to 30 minute drying schedule, depending on size and thickness. Once the piece is dry, fire it to the temperature required for the glaze to reach an orange-peel texture. Remove the piece from the kiln using raku tongs (figure 4).
Post Firing Reduction
In standard Western raku, objects are sometimes buried in massive quantities of fine sawdust. For naked raku, the use of sawdust generally results in excessive reduction, especially when using diluted glazes. For best results, my favorite reduction materials are curly wood shavings or very thin wood chips. One good handful, sprinkled on top of the pot, is usually more than sufficient (figure 5).

There are many theories about how long objects should stay inside the smoke bins, but I experienced that the time interval is rather flexible. In general, 5 to 6 minutes are considered to be a minimum, as most of the reduction process generally takes place within this time frame. During workshops, and for my own work, I generally leave them in for 10 to 12 minutes. The extra time assures a complete reduction and, as objects continue to cool down, also reduces the risk of cracks appearing.For larger monumental work, or fragile objects constructed with plates or slabs, it’s safer to go for 20 or 30 minutes, or even up to one hour. However, the drawback is that prolonged smoking may change the color of some clays from white to buff, or even light gray. Regardless of the time frame, cover the reduction chamber with a lid, and wrap a wet towel around it to keep the smoke from escaping (figure 6)

After firing, begin to remove the eggshell-like layer of glaze (figure 7). All objects need additional scrubbing, using plenty of water, to remove all traces from the firing, and residual fragments of the remaining slip and glaze layers. When using diluted or splashed glazes, some areas may be very hard to remove, and should be soaked in water for many hours, sometimes overnight.
Conclusion
Most of the forms and canvases of my sculptural ceramics relate to changes. Some works relate to the moment that water changes into ice, or starts to evaporate into steam. Others try to capture the nanosecond when a plane is shivering between air and soil, or try to evoke a build-up of pressure, that precious moment just before an explosion renders a piece into shattered fragments.
Life has always been about changes. If that is true about life, that is, to me, what my ceramics are about. Like the alchemist in medieval times, I try to manipulate the untamed metamorphosis during the process of firingceramic materials into another dimension, the ultimate amalgamate of substance and dreams of mankind.
Raku slip and glaze recipies :

 |
Wally Asselberghs lives and works in Schoten, Belgium. He presents workshops on Naked Raku techniques internationally. To see more of his work or for contact information, visit www.wallyasselberghs.be.
This article was excerpted from Pottery Making Illustrated magazine’s May/June 2011 issue.